My 1976 Jeep CJ-5
Find me on JeepForum
On-Board Air - Module One: The Compressor
The next order of business was to put together a design plan so I'd have a shopping list of the parts I'd need, how I wanted to mount an air tank (or tanks), where I'd like to be able to tap into the air and so forth. Turning to Dave Gallegos' write-up on Stu Olson's Jeep site as my primary guide, and with the ever-helpful suggestions from JeepHammer on the JeepForum pages, I formulated a plan. (Note, I don't have an air box or any of that "modern" stuff, so I was able to pretty much ignore the first few steps Dave followed.)
I knew I wanted to have air available from one location on the tub with which to air up tires (mine or someone else's) and run the occasional tool. I also wanted to have the option of a removable tank to use for remote needs. I also knew I needed a permanent tank that would be enough for larger/longer needs. But, more importantly, I wanted to make sure I wasn't going overboard in plumbing the whole vehicle needlessly. One quick disconnect on the tub is enough, and one under the hood. If I can't be bothered to drag a bit longer hose around to the front of the Jeep to air up tires then I'm getting *too* lazy!
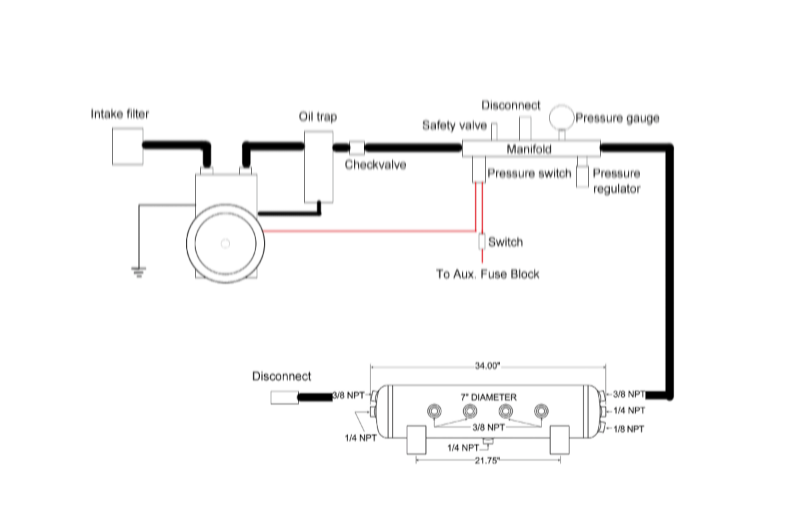
Under the hood I'd need an intake air filter, an output filter to trap/recycle oil, a check-valve after the output from the filter, a pressure switch to turn the compressor on and off, a pressure gauge (two actually, one mounted on the dash and one under the hood, a manifold to supply the tanks and the quick disconnect, and a safety valve that'll pop before the weakest part of the system overloads. Finally, I also wanted a master electrical switch on the dashboard (next to the remote pressure gauge) to ensure the clutch doesn't draw power when the Jeep isn't running. I included a pressure regulator as well for a future project plumbing air to my axles, distributor, etc., for playing in deep water (see the diagram below, which is by JeepHammer).
Based on Obi-Wan's experience I opted to run 3/8" hoses and connectors to maximize air-flow, especially to tools.
The next order of business was to put together a design plan so I'd have a shopping list of the parts I'd need, how I wanted to mount an air tank (or tanks), where I'd like to be able to tap into the air and so forth. Turning to Dave Gallegos' write-up on Stu Olson's Jeep site as my primary guide, and with the ever-helpful suggestions from JeepHammer on the JeepForum pages, I formulated a plan. (Note, I don't have an air box or any of that "modern" stuff, so I was able to pretty much ignore the first few steps Dave followed.)
I knew I wanted to have air available from one location on the tub with which to air up tires (mine or someone else's) and run the occasional tool. I also wanted to have the option of a removable tank to use for remote needs. I also knew I needed a permanent tank that would be enough for larger/longer needs. But, more importantly, I wanted to make sure I wasn't going overboard in plumbing the whole vehicle needlessly. One quick disconnect on the tub is enough, and one under the hood. If I can't be bothered to drag a bit longer hose around to the front of the Jeep to air up tires then I'm getting *too* lazy!
Under the hood I'd need an intake air filter, an output filter to trap/recycle oil, a check-valve after the output from the filter, a pressure switch to turn the compressor on and off, a pressure gauge (two actually, one mounted on the dash and one under the hood, a manifold to supply the tanks and the quick disconnect, and a safety valve that'll pop before the weakest part of the system overloads. Finally, I also wanted a master electrical switch on the dashboard (next to the remote pressure gauge) to ensure the clutch doesn't draw power when the Jeep isn't running. I included a pressure regulator as well for a future project plumbing air to my axles, distributor, etc., for playing in deep water (see the diagram below, which is by JeepHammer).
Based on Obi-Wan's experience I opted to run 3/8" hoses and connectors to maximize air-flow, especially to tools.
I like Dave's "module" approach to building the whole setup. Allows for construction of discreet groups of things as budget allows while still feeling like one is making progress. Not counting the initial acquisition and cleaning of the compressor as anything but the kickoff, Module One would entail completing the compressor with intake and exhaust fittings and a fitting for the oil return. Module Two would be assembly of the oil coalescing filter with check-valve. Module Three would be assembly of the manifold with gauge, pop-off valve, etc. Plumbing—from the output of the compressor onwards (including the tank) is just part of final assembly since it is pretty simple (along with wiring). The final effort would be the mounting of everything.
So, Module One.
So, Module One.
Rather than spending $45 for brand-new input/output Tube-O/Rotolok fittings from Kilby, I wanted to clean and re-use the fittings that came with the compressor. Gotta save where I can! However, I found that the threading on both fittings was damaged—didn't match the NPT threading on the brass fittings I was going to use to attach the output hose or the input filter. So, Kilby fittings it was to be.
Here are the parts as they arrived:
Here are the parts as they arrived:
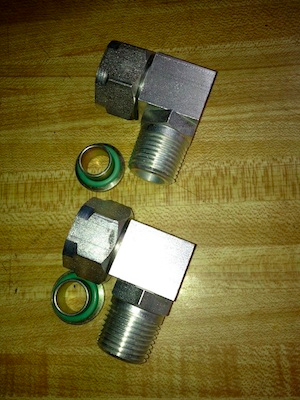
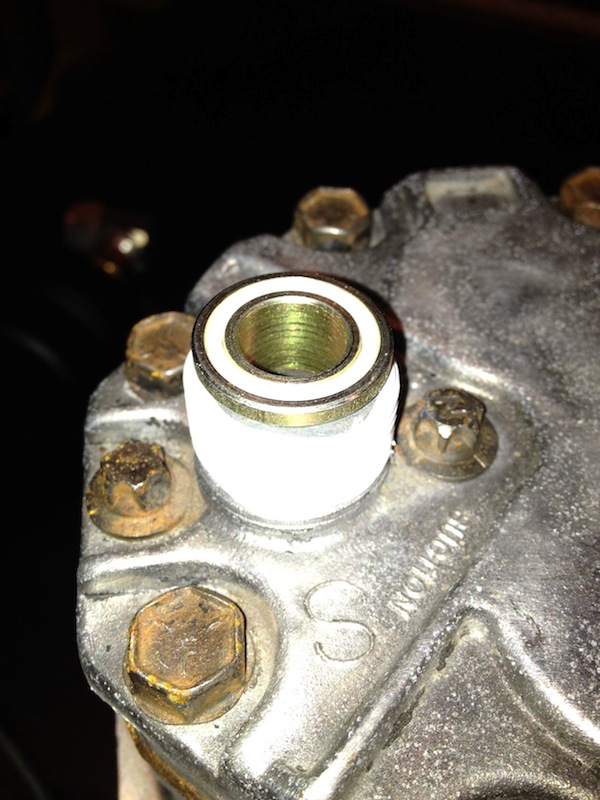
You'll see that the Kilby connectors came with Tube-O adaptors for those (like me) who need them. These simply seat into the top of the compressor before screwing down the fitting over them.

On the input side I needed an air filter and a female-to-female adaptor to connect to the intake fitting. I opted to use a Solberg FS-06-050 air filter from Amazon. Kilby sells these as well, but at a bit higher price (though he includes the female-to-female adaptor I had to buy separately). On the output side, I stepped down the 1/2" connector to 3/8" for the main output hose.
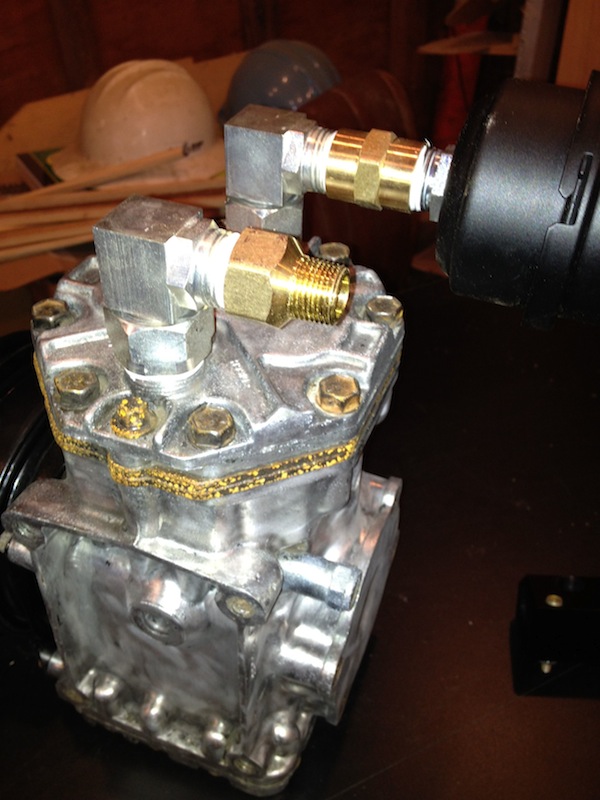
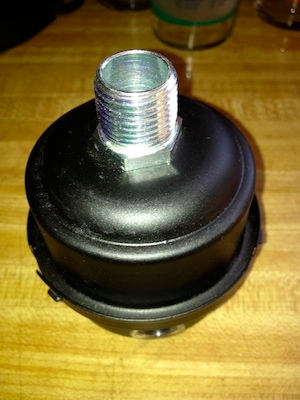
Finally, I replaced the oil-fill plug/bolt with a 90 degree elbow fitting into which the oil return line from the downstream oil filter will run. This allows for the recovery and recycling of any oil which travels from the compressor into the output plumbing.
Next step: